June 25, 2016

Penny Tiles: Finished

It's officially the first weekend of my summer. And, I am up north hanging with my sister while my parents take off to the ocean. Girls weekend!

This project has been a long time coming, but it's finally done. On my last post about this project I got a lot of questions about the whole "no-batting" approach to quilting. 

So here goes ... 


SUMMER WEIGHT QUILTS: NO BATTING
Final Thoughts 

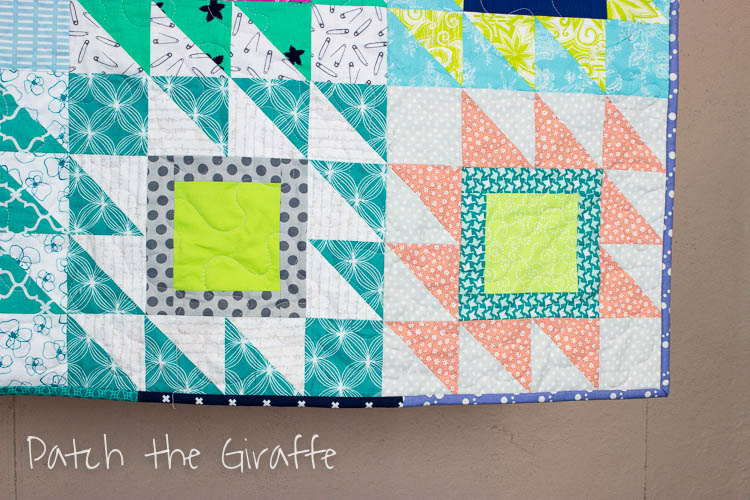
Bulk at Seams: Knowing I wasn't going to put batting in this quilt, I pressed all my seams open to reduce the bulk. There is still some bulk at the corners, but the hand quilting hides most. You can still feel the seams through the quilt. This doesn't bother me as much as I thought it would. It adds a little character to the hand quilting. 

Hand Quilting: I used Perle cotton #8 in white for all the hand quilting. Something that is easy to find at JoAnn Fabric, or you can spring for a more fancy brand. The hand quilting is chunky and creates a ripple in the fabric to add texture. Here is my tutorial to learn more. 

My Opinion: There is a time and place for no batting. A quilt with big squares would be perfect, the less seams the better! Also something that is hand quilted or tied would give the quilt better drape. I'm not sure machine quilting would look good. My thought is, it would be bad. Having spent many hours under this quilt while hand quilting, I must admit I love the weight. It wasn't too warm and was warm enough. Just perfect. 

This isn't an answer to every quilt, but it is possible with the right conditions. 

Binding: This was also my first attempt as using the backing as the binding. I thought the double bias binding would create too much bulk and mess with how lovely this quilt drapes. It worked out better than expected and was super easy. 
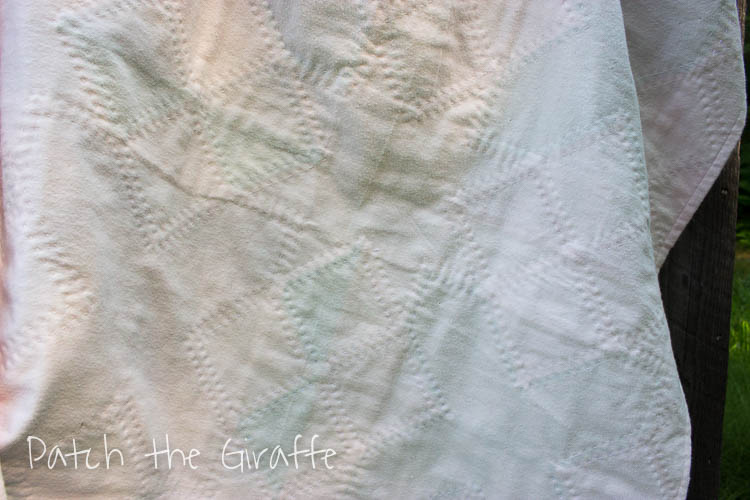


Detail of back.


So, this weekend while antiquing I did find an old sidebar that I am going to convert into a kitchen island.

Exciting.

My father didn't share in my excitement as he had to go pick it up 20 minutes aways. As a reward, he got an old road sign to put on the pole barn.

I think it was a fair compromise. Other than the fact I put another 100 things on his "Daddy Do" list in the course of 3 hours.  I guess he does deserve a weekend away!

P.S. I also found a stack of weathered hardwood up in the attic of this barn. Hello, dining room table!

June 22, 2016

Sugar Block Club: May + June

Where has the time gone? Ack. Half year already done, summer vacation is HERE! It's officially the first day of summer and I am all about reclaiming my life. So much has gone unattended.

May blocks are done! I also put in some Granny Squares and a couple Rocky Mountain Puzzle blocks as extras. Not sure about the June block yet, so that check is pending on my to do list. I might replace it with something else.

This quilt is becoming a collection of my favorite blocks along with some blocks from this year's Sugar Block Club. Here are the new additions to the collection.


These put me at 16 out of 30 blocks, so official more than half way done!


June 18, 2016

Bedazzling Blogger: New Blogger Info Guide

Welcome those visiting from the 2016 New Bloggers Blog Hop!  

Once upon a time I was in your very shoes entering the blogging world. One thing I really wanted when I started blogging was to create an appealing look on my blog. So, here is my brain dump on how to up your blog's appearance. 

Disclaimer: 
Let's not pretend I am an expert on Blog design or dictating what makes one blog better than another. Here are just some things I have learned in the process of working on my own blog and my personal experience. 


Back when I started blogging I thought the only way I could be fabulous was to pay someone to overhaul my blog. Not true. One thing I have learned is my blog is free, that's right free. I do subscribe to software (Picmonkey.com and Adobe Lightroom) to improve my pictures but I haven't put money into my online space, with the exception of social media icons. You don't have to hire someone to look cool, with A LOT of time and some patience it will happen for you too! 

Why I Follow Blogs or Don't Follow Blogs  


Some blogs I love for the "visual candy", some I love for the content. The one thing I enjoy is a nice clean blog that reads quickly with great images. 

VISUAL CANDY: term made up by Patch the Giraffe to describe sweet images that spark a sense of creativity deep within the soul. After indulging in said sweet, visual treat you feel the same euphoric buzz as a sugar high. The visual appeal is stunning and yummy all at the same time.

I strive to provide my readers something yummy to look at and make sure they have something to interesting and sometimes snarky to read. 

If a blog offers a clean layout and lots of visual candy, you can bet I am in! 

Here are some links to things that can be changed easily that make a big impact 


BACKGROUNDS: How to insert a different background click here. Google "open source backgrounds" to find the image that works for your overall look. Here is my current image, I like to change mine frequently to make the blog more interesting to me. 


ADDING CODE: Learning how to center date and title on your post click here. You can easily drop code into your blog without playing with the main code for the blog. For example, I Google searched "Center Titles in Blogger" and a bunch of videos and tutorials popped up and link to cut and paste code. If this scares you at first, no worries it did to me too. The more I have played around with my site the more comfortable I feel with futzing with the code.

SIDEBAR SOCIAL MEDIA: To learn more about hyperlinked images for social media click here. One thing that quickly cleans up a blog is organizing the sidebar, get your social media under control! It also lets the followers know other places to look for you. Look at some of your favorite blogs and see how they order their information. I purchased my icons for couple dollars off Etsy to help me with the process.


IMAGE EDITING: Learn how to making great mosaic images click here. I use picmonkey.com for all of my collage making, buttons, headers, and any image that needs to be created or edited. The site is free, but some features need a subscription. (Not an affiliate, I just love their site. Yes, I do subscribe). Check out the following image. I also use this site to create images with text.


PHOTOS: Use a nice camera and get comfortable with it. Every time I use my camera it get's easier to take photos. I shoot with a Canon Rebel on the AP setting. Recently I took the Craftsy class "Product Photography at Home" to gain some tips about settings and setting up cool shots. They also have beginner classes as well, this does help! I am no pro, but I do make an effort to keep improving.

Adobe Lightroom has a LARGE learning curve and big price tag, but does a great job editing photos. If you are not ready to make that kind of purchase programs likes Picasa are free. Personally, I edit every image that goes on my site. It also doesn't hurt to watermark images (tag the pictures with the blog's name). People like to "pin" images and having the source visible is good for blog traffic.

PAGES: The tabs at the top of the site organize information. People (ok, me) love an "About Me" page to learn more about the person behind the blog. They also love a "Tutorials" page. It takes a lot of time to write a tutorial but it's worth it to build traffic. My most popular posts over time have been my tutorials. Also having an archive of finished quilts of the past and current projects or sew alongs isn't a bad idea either. Most times its just to keep me straight!

MY BEST ADVICE: Starting a blog is overwhelming! Setting up the blog, creating posts, pages, upping the photography, keeping it all going. It's exhausting. When I started, I worked on one thing at a time. Looking at an established blog made my head spin with all the things I wanted to do. Take your time! It won't happen in the first month, or year. Don't stress, just enjoy the process. When you have a couple hours (bahahaha) just sit down to tackle one improvement.

If you have any questions please feel free to email. Or, if see something on my site you desire but wasn't discussed I can try to walk you through any changes or send you the code.


Happy Blogging


June 15, 2016

Amy Garro Weekend

Amy's Was Here 

Like, in person. So, you're dying to know. Here is the secret. 

She's awesome. 
Super nice, fun, and kind. Our guild started the weekend with a workshop and ended with a trunk show. It was crazy busy, but crazy fun. 

Class Highlights: 


As for a teacher. Amy was great. The class was fun and engaging. She only taught in small groups, which gave the members more individual attention. The class Icy Waters is listed as an intermediate class and we did have one beginner in the group. Amy was very good at checking in and providing extra support and sometimes just plain encouragement. 

One thing I really value in a teacher is someone who checks in with everyone attending the class even if they appeared to be going at a good pace. She made herself approachable and was very kind in her direction and advice. The class had a very laid back, relaxing atmosphere. 

At the end our members decided to throw down and challenge one another to finish their quilts for our next meeting. I cannot wait to see the finishes, some of the color schemes were super cool and unique.

Before the Trunk Show on Sunday we got to sneak in a trip to York, Maine. We added a lighthouse, fresh seafood, and beaches to the list of accomplishments. 


Trunk Show Highlights: 


I JUST LOVE THIS QUILT .... hmmm.

Then as fast as it arrived, it was over. All those beautiful quilts (did end up fitting, but only with a lot of force) got packed away and departed.

Final Score: Suitcase, 0. Amy, 1


Now for the bragging part of this post. Amy delivered me fabric. (Insert pangs of jealously). 

As she picked out these beauties she pulled fabrics that she most likely wouldn't use but described as "so, Chelsea." And, yes they are! Hello polka dots, you look fantastic today. 


That grey and aqua polka dot needs to be used in EVERYTHING from now on!


Oh the stacks in all their glory. 
They look beautiful. Best part is they all coordinate so they need to stay with one another!

General Consensus: you must have Amy visit. Can I say it again, she's great.  We had so much fun this weekend and it was well worth being tired the next morning. If only the fun never ended. 

June 10, 2016

Rocky Mountain Puzzle: Finished

Last year I participated in the Stash Bee, my hive mates all shipped in some fabulous blocks. LAST YEAR. This makes me a slacker! 

Sorry Hive buddies.

After feeling guilty that these pretty blocks have sat neglected, they got pulled for some long overdue TLC. I have to say I love them! Right?! They look so pretty all pieced together. 


I went with a scrappy binding and it added to the awesomeness here. Then some stippling all over for the quilting in a light pink thread. The quilt is small at 48 inches square, but would make a great quilt for a small child.


Today we are embarking on our end of the year field trip to the seacoast. Please pray for no vomit and no student gets washed out to sea! Also, school busses are nostalgic and that's it. They provide no comfort and are not designed for tall people.

Fabric Used: - 2 yards
Net Loss: - 92.5 yards YTD

June 06, 2016

Twisted Nines: Finished

Summer fever is in full swing for the students. The craziness that is happing in my classroom is insane. Just 10 more days! Not to mention my personal life has been non stop. Hopefully there will be updates on that front soon. Hint: I have been house hunting! (I could put in a 1,000 more ! points)

In the midst of all this crazy I did manage to whip up this baby quilt. If you don't remember I made the tutorial Twisted Nine's a couple weeks back. It uses two charm packs and a fat quarter for solid. 

It's a great little pattern if you need a baby quilt fast. 


To finish, I used a meandering stipple. This quilt finished up fast, only being 39 inches square. It's a nice baby quilt. The binding is a light mint color and the backing is bright pink polka dots. The colors ended up working out perfectly.


Fabric Used: - 1.5 yards
Net Loss: - 90.5 yards YTD

I cannot believe I have used almost a 100 yards of fabric AND still have so much around. It's been nice to see a "slight" decline in the stash. 

June 03, 2016

Another Dig in the Scrap Bin


Back dealing with my scraps!

In my post On the Issue of Scraps, I had mentioned leaving behind many oranges, navy, and greens. When I saw the mark up for Glass Snail Crawling Do. Good. Stitches quilt this month, it was the perfect fit for what I had in my bin.

The original was designed using these vary colors I need to use and works well with a scrappy theme. 

I started cutting immediately. Nothing like another project! 


I absolutely love how this one turned out. I adore scraps.

Now just how to quilt this one?

Fabric Used: - 4 yards
Net Loss: - 89 yards YTD