September 28, 2014

One of "Those" Weeks

The past week has been a no-production kinda week. I have been sick, but as a teacher it's more work to stay home then it is to actually go in and teach. So, I have been going to work, and then going to bed at 6 p.m. This little sick spell has drastically cut into my sewing and blog reading time.  Putting me very behind in everything.


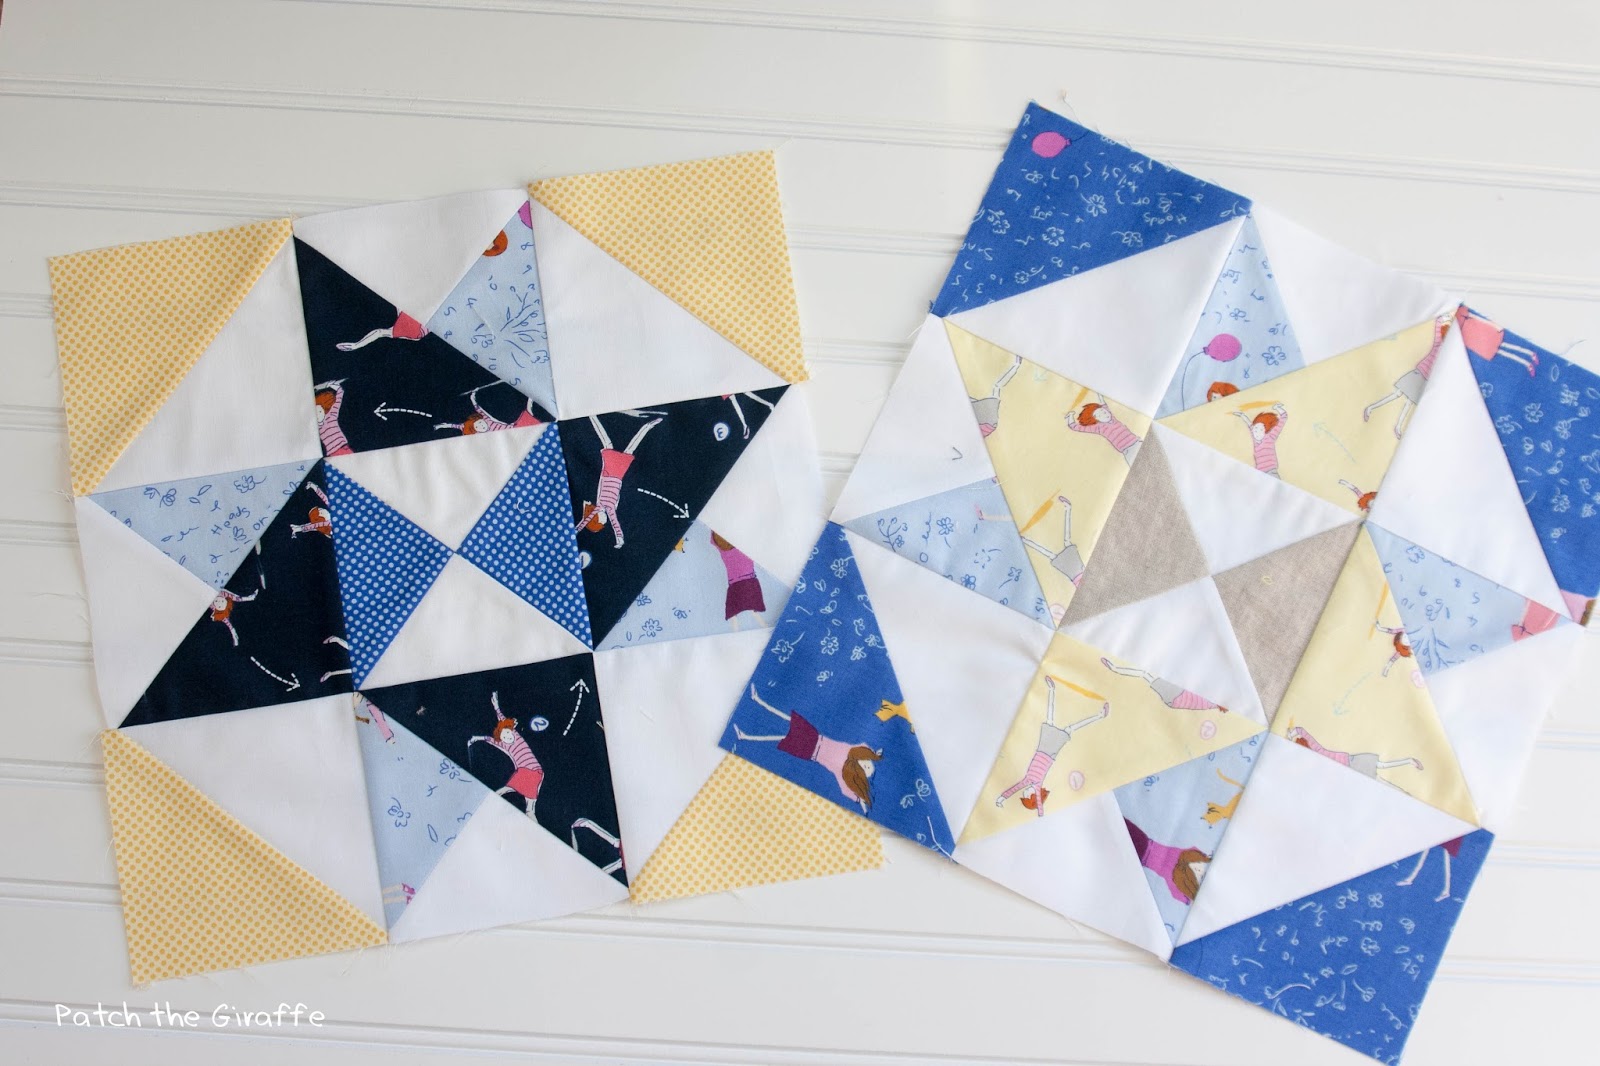
Now, it's Sunday and I have nothing to blog about, so I sewed up my last two charity blocks for our guild. Minimal production, but something. If you are getting comments on your posts from two weeks ago, I am also trying to read through my Bloglovin' feed.  Can I read 300+ posts in one day??? It's going to be a blog marathon. Hopefully, I can get some sewing time in later so I will have projects to blog about later this week.  Being sick is the pits.

Also, how do you like my new background? They are super easy to make, just purchase 2 - 2' square boards (I got these at Lowes) and painted each side for a total of 4 different colors. I was getting tired of with my white backgrounds and this was a cheap fix.  I used up some left over paint.  This color is actually the Pantone color of the year! You can also see my new chalkboard, my old one is traveling. If you would like to host the traveling chalkboard let me know! 

- Patch & Chels

September 23, 2014

Very Pink

As part of my fabric fast this year, I also took on getting rid of many of my scraps from long ago. A while back I pulled enough charm squares to make two pink quilts. For this quilt I chose the pattern "Road to ... oh Damn" it was the perfect pattern. After sitting around for a few months, this little cutie finally got finished.  


Road to ... Oh Damn
48 inches by 48 inches


I used a simple double loop stipple pattern, it was quick and easy way to top quilt. The backing was also pulled from my stash, using some some left over charm squares and a pale pink chevron print. 


This quilt is super pink and very girly, good thing I happen to know a sweet little girl who might be in need of a snuggly quilt!  

-Patch & Giraffe

September 20, 2014

Farmer's Wife Quilt Progress


My farmer's wife quilt blocks have gone a long time unattended. The blocks were finished back in May. As I was making a perfect little stack of my new blocks, I realized they were not all the same size. Some where a whole half inch off. All the blocks created using the templates were small! I must not have hit actual size when I printed the templates. This created a huge problem, if I cut them all down to size I would lose most of my points. Quite devastated and frustrated I put the blocks away.  


Over the summer I did cut the sashing and the corner blocks, then remembered my error and once again put the whole project away as it was too painful to see all those pretty points that would be lost with the addition of the sashing. All that time spent on the project only to have it look bad in the end. 

Look at the edges near the sashing and you can see all my missing points :(


This last weekend I finally trimmed the blocks to the same size and started putting on the sashing. It was hard knowing there wasn't anything I could do about all my disappearing points, I just worked on through and tried not to over think the process. The top isn't as bad as I had envisioned but it's not my typical level of craft. Overall it looks ok.

Two of my favorite blocks on the right
The original plan was to hand-stitch the whole top, but that would be too slow and I would fixate on all the mistakes. For that reason, I am going to machine quilt the top instead. The backing is going to be an orangey floral backing fabric I was gifted a while back.

Has anyone else ever experienced this level of disappointment on a project that has taken so much of your time?

-Patch & Chels


September 17, 2014

Be ... Encouraging

Another month has passed already, where is 2014 going??  There are only 3 more blocks this year ... crazy!  This month Amy has picked the theme of encouragement ... 


She reminds us that our words have a huge impact on those around us. Even if we do not believe in what people feel is best for them, we still need to encourage people to follow their hearts. At times this can be difficult for me (especially as a teacher) ... but allowing others to learn from their mistakes, is sometimes the only way people learn. Other times, people prove me wrong. 

 She leaves us with the following questions, when talking with someone ask yourself ... 
  • Will these words encourage this person?
  • Will these words show love?
  • Will those words set an example?
  • Are these words that I'm proud of, and can stand behind?
  • Are these words likely to stir, joy, peace, and strength? or the opposite?

We do a similar kid friendly version of this in school as a reminder of power of people's words. I am a constantly encouraging my students to be/become successful in school and, many of you know, I am also a huge cheerleader for my blogging buddies :). I would say, I am more the annoying over encouraging type. (Sorry, still need to find the balance on this one!).


So far all the months are looking good together! I cannot wait to see what the next three will bring.

What are some of your encouraging stories??

-Patch & Chels


September 14, 2014

First Dresden

My Grandmother is always picking up "things" when she has a coupon or see's a good sale, so she picked up a dresden plate template and allowed me to borrow it. I have wanted to try it out for some time. I always think about getting a template, then forget. So this worked out.


At first I was not quite sure what to expect. Well, to be honest, I never expected all my blades to come together, or at the minimum an epic battle would occur. I pulled from my scrap fabric just in case this didn't work and I cut at the 5 inch mark. This allowed me to use up some charm squares. Then followed the directions and it actually worked! 20 - 5 inch blades makes a 12 inch plate. Much easier than I had anticipated. 

Insert pat on the back ... here.


Now what? I have a semi-complete plate. I watched a great tutorial at Missouri Start Quilt Company and they give a great tip for the center circle, no spoilers, you'll have to watch!  Then pulled some low volume scraps to make a scrappy background. The final choice, this is going to be a mini quilt for my Grandmother. 


Ta, da! As kids we always said "mucho, mucho" instead of "I love you" to my grandparents so, it was only fitting this little quilt got our little phrase added to the bottom.  I embroidered the saying in red floss to make the words stand out more.


The binding is also from my scraps, you may remember this red from my Notting Hill quilt.

Another thing is checked off my bucket list, and I really like them!  Gram might not be getting her template back.

- Patch & Chels

September 11, 2014

Aja's Quilt Update

A while back, my sister picked out fabric for a quilt. I wanted to make her a twin sized (my very first) quilt for her bed.  She decided on Hello Petal by Aneela Hoey, but not the pinks! I did manage to sneak a couple of the magenta prints and one pink print in! The idea was to give this quilt to her for her birthday, but that was back in July, so Plan B, it's a Christmas present. This gives me more time!


Today I took the time to get the blocks all assembled ... here they are :) 


Now I just need to find some times to put on the sashing and borders!  Today I leave you feeling productive :).  How are you feeling today?

-Patch & Chels

September 08, 2014

"Tone it Down!" Low Volume Swap


Michelle, over at From Bolt to Beauty, and I are doing a Low Volume Charm Swap this fall. I had jokingly mentioned doing a swap to help Michelle build her low volume stash on my Around the World Blog Hop post, and people said they would be interested. So, let's make this official!

Sorry, to all my international friends, due to postage and this being our first swap we are going to limit it to the United States only. If you are interested in doing an international swap leave a comment. Then next time we can open it up to our overseas friends, if there is enough interest :)


DETAILS: 

Fabric Type: Low Volume
Fabric Size: 5 inch Charms
Participants: 28 Peeps, first come first serve! Don't wait :)
Timeline: Fabrics Due, Monday October 6th, 2014
Fabric Returned: Mailed out, Monday October 20th, 2014
Yield: 56 charms, 2 of each print

FABRIC REQUIREMENTS: 
  1. Each person will purchase 1 yard of fabric and cut it into 5 inch charm squares.  1 yard will yield 56 charms exactly, you may want to purchase 1.25 yards just in case of an oops when cutting.  
  2. Scale matters, choose prints that will work with a 5 inch square (smaller prints work the best for charms!)
  3. Fabric should be designer label, 100% cotton, quilt shop quality fabric. (No Hancock's, Joann's, or Michael's fabrics)  
  4. Fabric must be new and unwashed from a smoke free home.
  5. Before mailing cut the fabric into 56 - 5 inch x 5 inch charm squares. Press/iron before cutting to ensure accuracy. Unsure how to cut a charm, check out Elizabeth Hartman's tutorial
  6. Send your fabric in a Ziploc bag with an index card with your name and email address.
  7. Upload pictures of your fabric to swap to our Flickr group and include the name of the fabric, designer, etc. This will help ensure we won't get duplicates of fabric and also, find out more about the fabrics we will be receiving. Or, if you really love one of the prints and just want more, you will know how to get more! 


 SHIPPING:

All participants must include a prepaid self-addressed, stamped envelope along with their charms when mailing. The best way is to include a prepaid priority mail envelope for $5.60, if it fits it ships :) This will make it faster for us to get your fabrics back to you A.S.A.P! 


Are you convinced yet? Head over to our Google Doc's page and sign up, or leave a message with your name (make sure you're not a no-reply blogger!) Remember this is first come first serve. The first five extra peeps will be placed on an alternate list in case anyone drops out. Also check out our Flickr group to see what everyone is getting before purchasing your fabric!

If you really hate low volume, the term, or the fabric, head over to Ellison Lane to find out the details on how to host your own swap. The post is very helpful and includes lots of tips to help make your swap run smoothly :) 


-Michelle & Chels


September 05, 2014

Looking Dapper?

My summer goal was to get my WIPs down from twenty to five ... well, that didn't happen. It was a very ambitious goal! I was able to complete ten projects over the course of the summer, still calling that productive! Even if I was five shy of my goal, each project got worked on so they are all closer to completion! That should count for something. I also made a vow to myself that after I got all my projects under control I would only have five going at any given point. So, here's to project eleven!


Here's what I figure, since I got so much work done I deserve a new project! (pretty sure this justification is exactly how things got out of hand last time!) While working on my Thimble Blossom's sampler, I feel in love with Camille's Dapper block from her book Simply Retro.  Funny this is, it never drew me in until I actually made the blocks.  Does that ever happen to you? Once I saw these blocks with my own eyes, I was in love. 


She had made this pattern for her son's with two different variations on the pattern. It was a good idea for a baby/young boy pattern. For some reason, I always have a hard time finding good boy patterns/fabrics. Plus, it's only fitting to have at least one baby boy quilt hanging around. From this decision I pulled some "boy" colors, aqua/orange/gray and went with the idea.  


The backing is the blue dot behind the book in the photo above, it's flannel. I have made full quilts from flannel, but never just the back. This smoky blue dot was perfect with the colors and will be the perfect size for the backing. Plus, adds to the overall snuggle factor of this quilt.

Love it when stash fabrics work to my advantage! 

-Patch & Chels

September 02, 2014

Just Swell

Swell 
Finished size 60 in. by 66 in.
From the book Simply Retro by Camille Roskelley


Say hello to the tenth finish of the summer (you cannot see number nine yet!). This project was from some time ago ... last year. I used up some of my cool 2.5 inch scraps to complete the top. It was a perfect scrappy quilt for all these squares!


The backing is an aqua floral, I picked up on sale and had enough to do a complete backing (that happens almost never!). The binding is a deep purple polka dot that is also used in the quilt top. 


The top was quilted using the dogwood flower, this time I was good and took some pictures of the quilting. It's a fun top quilting pattern and can be done on a simple domestic machine. If you're interested check out the tutorial at Oh, Fransson!  It takes a while to get the flow of the flower down, I would recommend practicing before starting on a quilt. The first time I used this pattern it took a couple rows to get into a rhythm, then it all clicked. Almost none of my flowers are perfect, but it adds to the character of the quilt :)   


Hopefully everyone enjoyed their Labor Day weekend here in the states! This weekend was crazy busy, many of my cousins came from all over to visit. Between all the parties and plans, a group of us did get in another great kayak trip down the Pemigewasset "Pemi" River. In the photo below my friend's daughter was in my kayak. She was getting the whole rowing thing down, then quickly gave up! Although, entertainment was provided by singing "Just around the River Bend" from Pocahontas. 


-Patch & Chels