January 29, 2014

Farmer's Wife Quilt Sampler

I know so many people out there have already mastered, conquered, and overcome the challenges of the Farmer's Wife Quilt Sampler.  I on the other hand have not, and am honestly, kinda scared.  Hopefully, there are a few others out there who haven't started yet and would like to.  This is also one of my ten goals for 2014.  I am looking forward to getting one more thing accomplished.

First off the book uses templates!  Great for those who hand stitch, not great for those who like to get thing done fast and efficiently.  The last two weeks have been spent going through my book marking up the pages to find the quickest and easiest way possible to make each block.  Yeah, lots and lost of math.  Good thing I am a math teacher and some geeky side of me thinks it's fun.  

After going through each page, it was time to pull fabric.  This stack all got pulled from my stash.  You can see the colors are bright and fun, almost tutti-frutti.  I focused on pulling, reds, pinks, oranges, lime greens, mustard yellows, aquas, and a few grays.  Later I may need to pull some darker or richer colors to make certain blocks pop.


Isn't that chalkboard adorable?!  I ordered it off the World Market website, how could I not!!
Teacher Tip: Soak the chalk in water, it writes better and stays on longer.

Now it's time to get started cutting into that pretty sack of fabrics and making some blocks.  Next thing to decided, which one first?  The choices ... 

Sew long, 

CHELS


January 27, 2014

Father's Dream


 I have always wanted to try a "low volume" quilt.  Although I had to toss in some splashes of colors to help the blocks stand out.  Here is my "Father's Dream" baby quilt.


I recently purchased the 500 Quilt Blocks book by Lynne Goldsworthy and Kerry Green and instantaneously fell in love with the "Father's Dream" block.  I liked the main block and all it's variations!  ** This book is great because not only do you get every block imaginable, you also get every variation of the block as well.  The cover says the only book you ever need, they were not joking.  


Here is my version of the main block.


And, my versions of the variation block.


 The backing is going to be a cream color with light pink dots to tie together the low volume theme.  The blocks each got sashing and a light aqua square in each corner.  (Sorry about the blurry picture)


 Another variation of the block. 


This little beauty is currently laying on the floor all basted.  Hopefully, there will be final pictures soon.  The plan is to stipple the top, but I may use a heart loop pattern.  I am still deciding.  

Sew long, 

CHELS 

January 24, 2014

Tumblers Part II - iPad Cover

So those two blocks I made earlier this week are getting turned into an iPad cover.  I recently received an iPad from my district.  For the first few weeks I didn't have a cover and was terrified to take it out of the box.  I literally used the thing in the box.  Pathetic, I know.  It took this long for me to get one iPad if anything happens to it, it won't be replaced.  Now that I finally got the keyboard case, I wanted a little more protection for traveling to school and back daily.  Here is my solution.  


If you would like to make your own iPad cover, you will need the following.

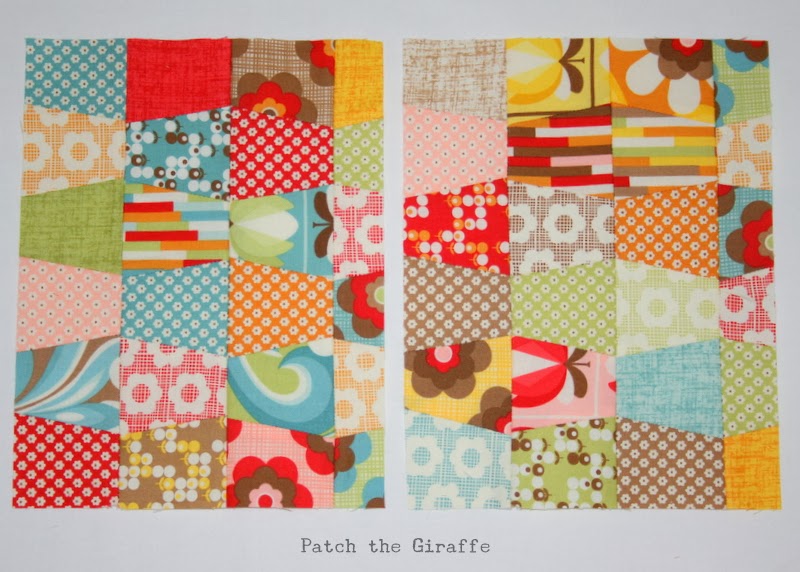
28 - 2.5 inch tumbler sewn into a 7 inch by 9 inch block
2 - 1.75 inch by 7 inch - White
2 - 1.75 inch by 11.5 inch - White
1 - Color A (orange flowers) 9.5 inch by 11.5 inch - Back 
1 - Color B (red flowers) 1.5 inch by 21 inch - Ties
1 - 9.5 inch by 17 inch - Linen Pocket 
2 - 9.5 inch by 11.5 inch - Chenille Lining
2 - 11 inch by 13 inch - Batting


I am going to make two iPad covers, one for each block.


First, sew the 1.75 inch by 7 inch pieces to either end of the block on the shorter end.  Press and trim.


 Sew the the 11.5 inch strips to the other side of the block.  Press and trim.  

I spray basted the back and the front to each piece of batting.


You can pick any pattern to top stitch the front and back.  I used a straight stitch, each line 0.5 inches apart for both.


Next, lets make the ties.  Start by pressing the edges of the strip to the center as shown, then fold in half, press again.  


Sew 1/8th of an inch in on the side that is open.  You may also sew along fold, but is optional.  


Once you have finished the 21 inch piece, cut in half.  You now have two ties to enclose the top.


To make the back pocket.  Fold the piece of linen in half and press.  Top stitch along the fold 1/8 inch from the edge.  

Next, pin the linen to the back using pins all along the edge.  


Pin the front to the back part, right sides together.  Sew along the two longer sides and one of the short sides.  The other short side will be the opening, leave this side alone.  When starting and ending make sure to back stitch.  This will the help the cover endure more abuse.  


Do the same to the chenille lining.  This time you will need to leave an opening at the bottom.  This is necessary to flip the cover right side out.  Reinforce the top and opening by backstitching.  


Find the center on the outside part.  This is where you will pin one of the ties to the right side.  Repeat on the other side. 


Flip the chenille lining right side out and tuck inside the top, make sure the right side of the top is with the right side of the lining.  


Match the edge of the outside and lining together, pin.  


Next, pin around the entire top.


Sew around the raw edge.  Flip right side out, using the opening in the lining.  Sew together the opening, I hand stitched it closed.  You are now finished.  Enjoy!  

Image the front.


Image of back with pocket. 


If you have any clarifying questions or need help on any of the steps please leave a comment below.  I will do my best to provide any tips or advice.  

Sew long, 

CHELS

January 21, 2014

Tumbler Part I

This cute little 2.5 inch tumbler template was a FREEBIE with my Missouri Star Quilt Company's 12 days of Christmas sale.  Luckily, I had a mini charm pack on hand (still going strong on my fabric fast!).  The Boho pack was perfect for the job.  I also had a few fabrics from the line to help complete the project.  The first part is sewing these little tumblers.  The second part will remain a secret.  Shhhh!


First, I started cutting all 42 mini charms using the template.  If you don't want to purchase a template, you could make your own.  The hard cardboard that comes with the mini charm works great for templates.  Cut the bottom side of the square so it is 0.5 inches in from both edges to form a trapezoid.  


This is such a cute line of fabric, check them all out!


Sew each of the pieces together matching the small end of one piece to the larger end of another.  Keep sewing until each piece forms a pair.


I would recommend chain piecing. It saves on thread and time!  


Sew each of the pairs together until you have 7 rows of 6 tumblers.  Press the seams, I pressed them open for this project, but you could press all one way.  Make sure you carefully pin each of the rows together.  Personally, I am not a huge fan of pining anything, but for this project it was necessary.  You will have three rows pinned together and one remaining.


Keep pinning and sewing the rows until all 7 rows create one large block.  Once again, I pressed the seams open.  This helps the block lay flat.  


Once the block is pressed, it's ready to get squared.  This block measured 9 inches by 14.5 inches.  ** The final size may vary depending on seam allowance, I used a 1/4 inch.  


To get the tumblers ready for the next part I cut the large block into two smaller blocks each measuring 7 inches by 9 inches.  Then trimmed 0.25 inches off each of the raw edges.  Now edges are square. 


Oh, the potential these beauties have!


The next part of this tutorial is coming shortly.  Just wait and see what these two blocks get turned into later this week!

Sew long, 

CHELS

January 18, 2014

Gifts for Jill


Last year my cousin Jill started quilting.  She has been living in Spain for a couple years now, so I don't get to see her often. While she was home last summer,  Jill came to visit and spent time learning to quilt.  It was great to catch up and share my love of quilting.  She has since started quilting on her own.  How exciting!


For Christmas this year I put together a basket full of goodies.  Including a needle book and pincushion made from Marmalade fabric by Bonnie and Camille.  Each of those little squares is 1 inch by 1 inch!


Detail of pincushion.


She often has to travel for the holidays, so I didn't want anything too big.  This little project was just the right size.  Her next adventure is moving to Ottawa, Canada.  Once again she will be spending long periods away.  At least now she will be a shorter (and cheaper) plane ride away!


Detail of book front.  The front and back were hand quilted using a light aqua floss (DMC 504).


The inside of the book is the same fabric used on the bottom of the pincushion. 


Here is the book open to see both sides. 


This little basket of goodies is packaged up and ready to head off to oh, Canada.  Hopefully she enjoys them!  

Also the basket was hand made from 1/4 inch Rabbit Wire, something found at any local hardware store.  Some little project I found on Pintrest and thought would be easy and fun.  After my hands were covered in blisters, bandaids, and first aid cream to numb the pain.  I came to the conclusion this was not fun.  I did manage to finish three baskets before quitting.  Although they are cute and customizable, they are not worth all the skin on my hands!

Sew long, 

CHELS