February 28, 2015

Quilting for Some Small Friends


One of my friends recently let me watch her kids, and as payment she got me a gift card, so I used it to buy some fabric and make her kids quilts. Sneaky way of not accepting payment, bahahahaha. Today the kids came over to check out their new quilts. Verdict - they love them! 


Here is the quilt for Little Miss, and below the quilt for Little Mister. Both are made from HSTs but different designs.


Each quilt is backed in white flannel that has light blue polka dots to make them super warm and snuggly. The left quilt got straight line quilting a quarter inch from each seam, and the right quilt got an all over double loop pattern.


Little Miss definitely loved her quilt! 


- Patch & Chels

February 25, 2015

Reporting from Hive 6

FINALLY! I am getting a second to share February's stash bee blocks. Samantha wanted a disappearing 9-patch quilt made from navy, royal blue, lime green, white, and gray. After looking through my scrap bin I found some great fabrics in those colors, so much so, I made two blocks!


Samantha's question this month was have we made any goals for this year. Well, have I? So far the only thing I have accomplished is zippers, and lots of hopes and dreams.  This week is vacation so I am tackling my WIPs, more like making a small dent in the list. 

-Patch & Chels

February 22, 2015

Sunday Stash

I CAVED!

There are so many pretty Cotton + Steel fabrics out, I said I wouldn't buy them. I don't need them. After I won a FQ bundle at our last guild meeting, I decided to make my Moda Modern Blocks quilt from Cotton + Steel. The flood gates unleashed .... 


Got a little carried away! They are so pretty. Linking up with Molli Sparkles this fine Sunday.

-Patch & Chels

February 18, 2015

Mastery of Zippers


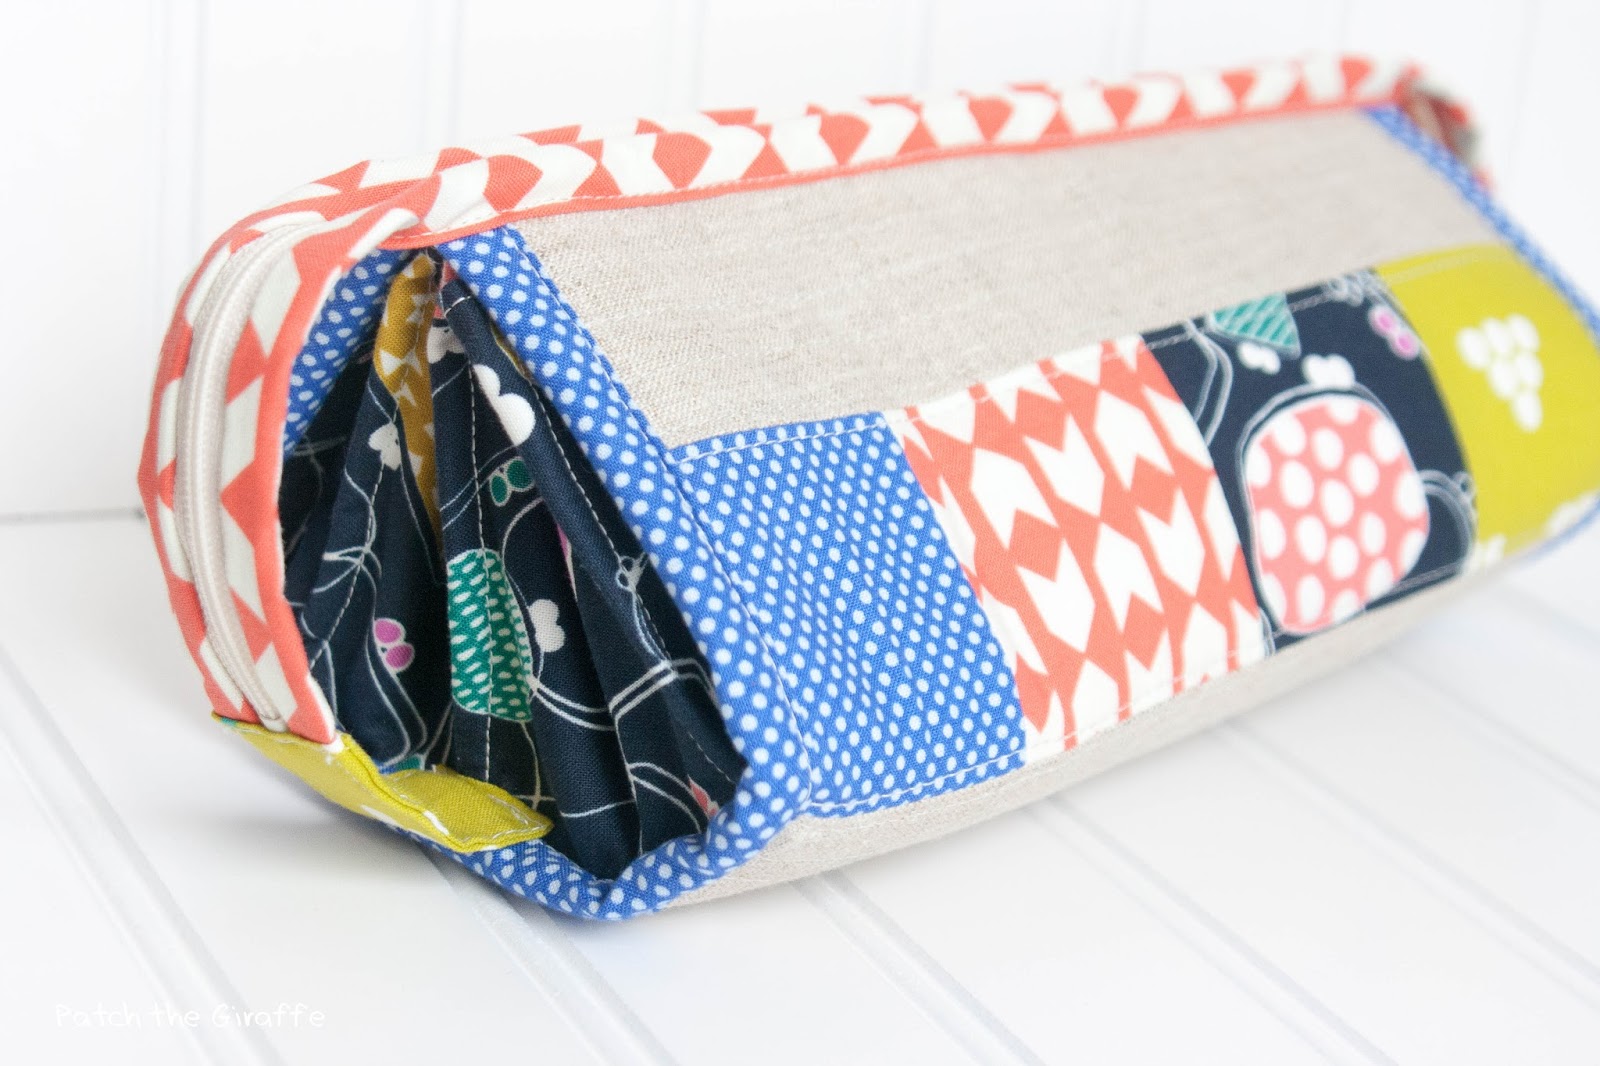
My whole life I refuse to do anything the easy way. In the case of mastering zippers the most logical approach would be to try out a simple zippered pouch with one zipper in the design. Nope, that's not my style. Instead, I take on the sew together bag that happens to include 4 zippers.  Silly me.


Armed with some motivation, I went down to sew with Michelle at From Bolt to Beauty for a good dose of knowledge. She is very methodical and takes the time to measure, pin, iron, and place everything. It was amazing how much attention she pays to details.


I found out my quilting style is more along the lines of the Tasmanian devil. I leave a wake of destruction, eyeball everything, and forget to pin most of the time. Even though our styles are drastically different, she did teach me a few things about zippers. The first attempt was iffy and slightly wonky, after that I got the hang of them. Thanks Michelle for the help!

Finally, I started to remember to move the zipper head mid-sew, as no matter how hard I tried the foot would not go around them. Lesson learned. Pretty sure I used my yearly quota for pinning in this project!


After 3 hours of sewing in one night, the bag was about 85% complete. Getting late, it was time to go home.  Looks like this bag will get finished sans zipper expert nearby. I remained hopeful.

The next night, equipped with a glass of wine, I tackle the remaining and final zipper for the bag. It goes in without any major snafus. Success. Without too much trouble the bag is complete, not perfect, but complete. This little bag is going to hold all my hand sewing items, and you will be shocked to see how much this bag holds!


Chels, 4. Zippers, 0. Looks like this goal for the year is checked off, 14 more goals to go!

-Patch & Chels

February 14, 2015

Paper Pieced Modern Book Tour + Giveaway!


The only way to describe Amy @ 13 Spools is original and cutting edge. Amy works to provide the quilt world with new and refreshing ideas. Following her blog is just inspirational, so when she asked me to be apart of her new book tour I jumped at the opportunity. I just love her style.  ** Disclaimer: I really love her work this much and all these words are mine, no bribes as promised :) **

 - The Bachelor - 
photo by C&T Publishing


Happy Valentine's day! Well, if you are a bachelor, maybe not so much. I got a huge chuckle when Amy asked to share a quilt called "The Bachelor" today.  Oh, the irony! To all the bachelors out there this quilt was designed just for you to give you some cheer on this day :) What I like most about Amy's designs is how universal they are, many quilts have a masculine touch. They are great patterns for guys, something, I find very challenging to find.


So here are some quilt stats ... 

The quilts finishes at 80 inches by 101 inches, that's right, it will go head to toe on even the tallest of bachelors. The block size is 12 inches by 12 inches and are a little time consuming to piece, if you are worried about the narrow design, with paper piecing everything is much more accurate. Don't fret. The rest of the quilt goes together quickly. Doesn't it remind you of a football field? The ticking reminds me of the yard markers. 


"This quilt block took a number of hours for me to design - not that it was terribly difficult, but that it took me quite awhile before I settled on it's angle and the number of rectangles to use. This is a variation on a Courthouse Steps block. I think that Courthouse Step blocks and Log Cabin blocks lend really well to masculine designs, so I decided this would be a manly quilt. I worked it into an Essex linen background, and Emily of Emerson Quilting placed straight lines across the light gray rectangles, and large pebbles in the background. She did some ditch-stitching to accentuate the lines within the block." - Amy Garro


If you would like to see some of the other quilts in this book check out the other posts! I promise they don't disappoint ...
Feb 13th - Amy @ 13 Spools


Today giveaway is a copy of the book Paper Pieced Modern, hard copy for U.S. winners and e-copy for international winners. In order to enter the giveaway tell me who you would make this quilt for in your life! If you cannot stand the thought of not winning, you can head to Amy's Etsy site to pre-order a signed copy! 

** The giveaway is now closed **

Best of luck, 
-Patch & Chels

February 11, 2015

I Heart You Quilt + Tutorial


Materials: 
1 - Layer Cake (Flirt by Sandy Gervais)
1.75 yds. - Background fabric (Above is an assortment of white on white prints & creams) 
Heart Block Tutorial @ Cluck Cluck Sew 


When I saw the heart block tutorial I immediately pulled the layer cake of Flirt, and thought this is perfect. This quilt only uses the materials listed above. Yes, this layer cakes goes the distance! Here are the directions so you too can make your own ... 

Directions: 

Step 1: Choose 16 prints to make the hearts, then follow the 9 inch block directions @ Cluck Cluck Sew. You will need 4 - 5 inch strips to subcut into 5 inch charms (32 in total) and 3 - 1.75 inch strips subcut into 1.75 squares (66 in total). **Sew another line a half inch from the center line to get 2 more HSTs from each heart. Image below shows the lines sewn on each block. At the end you should have 16 hearts, and 32 HSTs (square them to 4 inches and put aside).


Step 2: Cut remaining background fabric into 12 - 2.5 inch strips for sashing around each block.  Subcut 20 - 9.5 inch strips for either side of the blocks. Arrange your blocks in a 4 x 4 pattern. Start by sewing the 9.5 inch sashing on the left/right side of each block to create 4 rows. Place sashing on the top/bottom of each row and sew rows together. There should be some sashing left over, this will be used on the back. Now, the top is complete!


Step 3: Pick 20 of the remaining prints to be used on the back, sew them together in rows of 5. Now, take all the extra HSTs and sew them together anyway you desire to create a 2 x 14 row. (I just used a pinwheel pattern.) Next, sash either side of the HST row with the remaining sashing. Sew the 4 rows to the HST row to complete the back. Warning: the back isn't much bigger than the front, so be very careful basting!


Step 4: Take the remaining 6 prints and cut them into 4 - 2.5 inch strips. ** All 42 squares should be used by now! ** Sew the strips together end to end, to create the binding. All the strips together will be enough to wrap around the quilt. You could also substitute yardage if you are worried about that many seams. Iron binding in half lengthwise. 


Step 5: Make the quilt sandwich, however you prefer. Once again, be careful when basting the backing and the front are almost the same size (only 1 - 2 inches of overhang). Quilt as desired (I used a stipple pattern), and sew on the binding. Personally, I like the look of hand-stitched binding, but machine binding is quicker. The quilt is now done :)


If you have any questions let me know!! This is a great way to use up a whole layer cake that just might be laying around :) No need to fuss with backing and binding either, it's all included! Also check out Alison's other tutorials, I am an huge fan of the star block. 

Quilt Stats: 

  • Finished Size: 45 inches x 45 inches 
  • Pattern: Heart Block Tutorial 
  • Fabric: Flirt by Sandy Gervais, assorted whites/creams
  • Batting: Warm & Natural - white
  • Thread: Connecting Threads - light pink

Today I am linking up with Stephanie and Michelle at Late Night Quilter, she is starting Tips and Tutorials Tuesday. If you have any tips or tutorials that are worth sharing link up, she is offering prizes each week for the first month! 

New Blogger Series

-Patch & Chels

February 09, 2015

Layers of Charm

A while back the Fat Quarter Shop contacted me about participating in their newest pattern release.  Well, duh. I said yes! Layers of Charm uses one layer cake and one charm pack.  Hence the name :). After much debate a layer cake of Pedal Pushers by Lauren & Jessi Jung was my final decision, paired with a charm of Kona white. The line is just happy. Everything about it brings a smile to my face. If you would like to make your own head over to the You Tube video, here, to find out how.  


The past couple of weeks the weather has not been cooperative. The view form my window right now looks more like a snow globe. 48 inches of white fluffy snow plus epic wind gusts is not ideal photo conditions. Neither is inside, but it's the best option right now. Sadly, the photograph doesn't do all these pretty fabrics justice. 


The ease and simplicity of the pattern makes it a good afternoon project. All you have to do is sew from corner to corner across the charm square and the block is done. If you hate waste like me, then sew another line a half inch from the center for a bonus HST. Arrange the blocks and sew the rows together. The backing is pieced using white strips and leftover squares. I do enjoy pieced backing for a couple reasons. One, it adds a bit of pizzaz to the quilt. Two, it uses up extra fabric from the same line and reduces scraps. For the quilting an all over stipple pattern with aqua thread did the trick. 


With the additional HSTs birthed two decorative pillows. Some backing was made into binding for these two and hand-stitched the tops for additional decorative flair. If you absolutely hate scraps this was a great little extra. From each quilt you can get an additional 36 - 4 inch HST after trimming.  


What layer cake would you use to make this quilt? Have one already with no project in mind, I highly recommend this pattern :) 

-Patch & Chels

February 04, 2015

Star Mini


Anyone out there ever have huge elaborate grand plans? Like paper piecing a 100 stars into a bed size quilt, grand plan? Apparently, after 9 blocks in my grand plan had fizzled out. These blocks have been hanging around my sewing area for some time now. Ok, a few years, lets be honest. Since, there is absolutely no intentions of finishing the last 91 blocks I sewed them together with one inch sashing. Change of plans, but another project is now done! Thank you snow day sewing for allowing me some extra time to futz around :) 


The center block here is my favorite! The top got quilted using quarter inch straight line stitches all over. It did takes some turns to visually add to the quilting. 


The quilting took forever, so it probably won't become my new favorite, but it works out well for smaller quilts. Now I just need to decide where to hang this beauty! Has anyone else got to enjoy some snow day sewing?

-Patch & Chels

February 01, 2015

Sunday Stash

One of my blogging friends recently opened a little fabric shop on Etsy. You many know her as Kelsey from Lovely & Enough. She does gorgeous screen printing (still amazed by that process) on  high quality cotton. These are printed on Kona and Art Gallery.  So, no shortage of luxury. 


Kelsey was nice enough to allow me to pick out my own bundle, yippe!  As much as I loved the thought of putting together a one of a kind package, it was so difficult with all the great prints/color selections. Her taste in colors is very similar to mine, so it was extra hard. Here are my final decisions ...


Pistachios in coral, printed on Art Gallery. Bunting in peach, printed on Kona peach sherbet. ** Favorite from the bunch! **


Pistashios in citron, printed on Art Gallery. Hortensia in citron, printed on Art Gallery snow.


Now the real question, what to make with these beautiful fabrics? A mini/wall hanging? Any suggestions?

-Patch & Chels